|
|
|
|||
|
|
The World Wide Web and Your School District A guide to setting up, deploying and managing Microsoft
Internet Information Server 5.0 for the non-technical staff. |
|||
|
|
|
|
|
|
|
Windows 2000 Server Internet Information Server 5.0 FrontPage 2000 Web Folders Active Server Pages |
||||
|
|
|
|
|
|
|
|
|
|
||

Conventions used in this document
Considerations, Information and Supplies
Web Server Procedure Check List
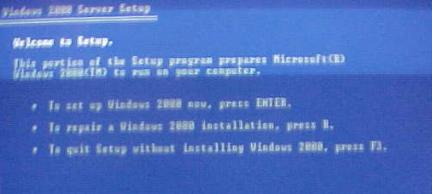
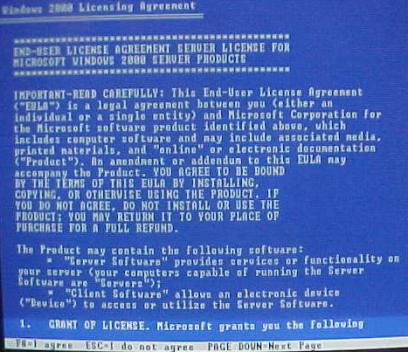
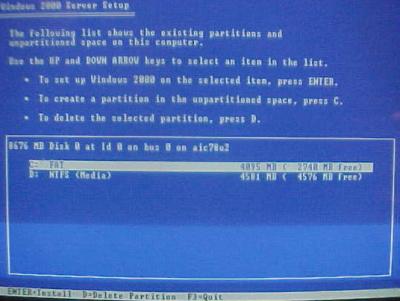
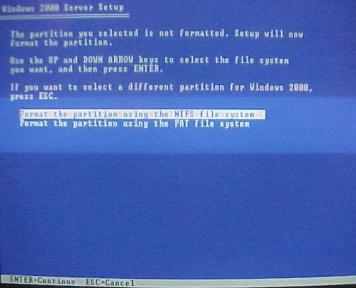
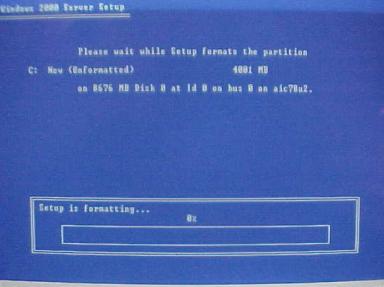
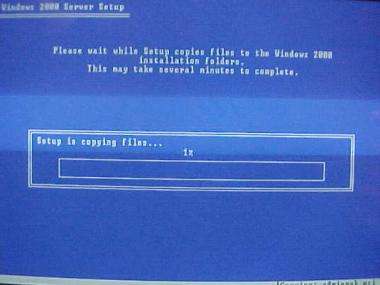
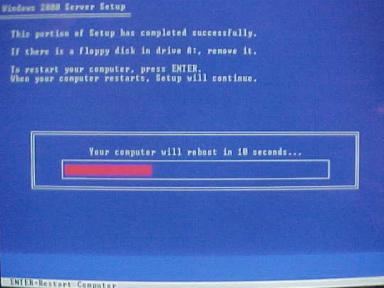
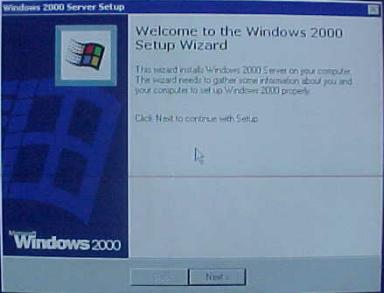
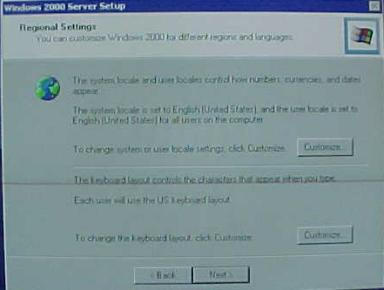
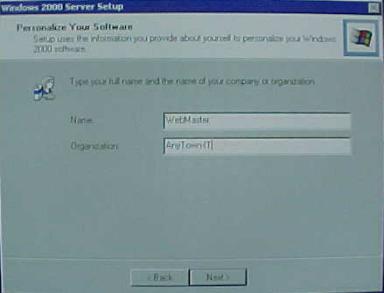
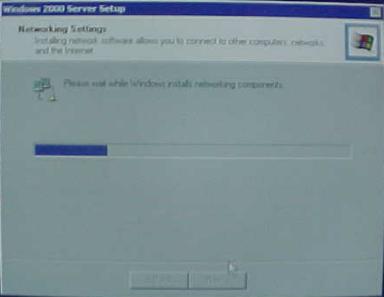
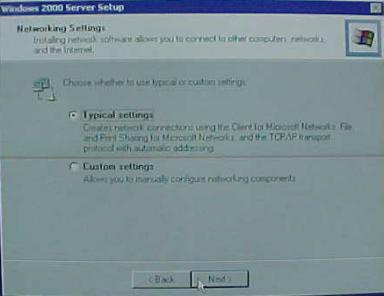
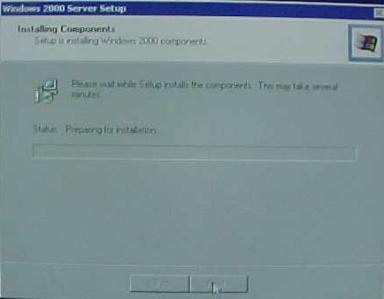
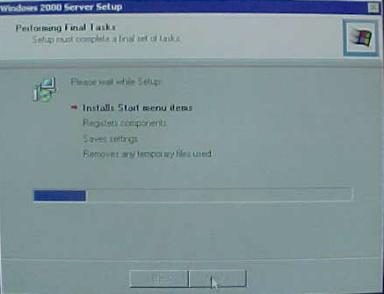
Installing Windows 2000 Server
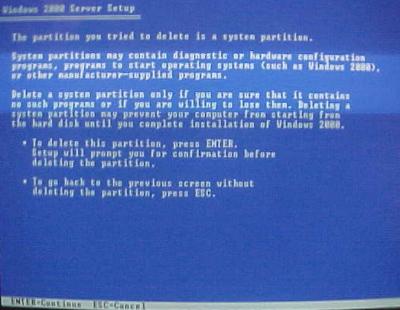
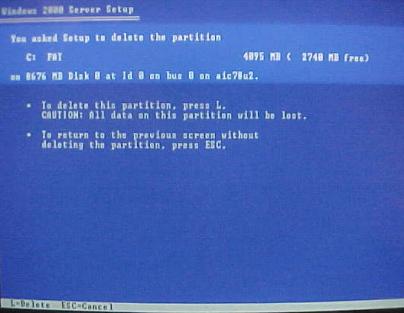
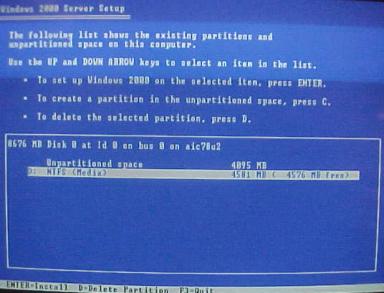
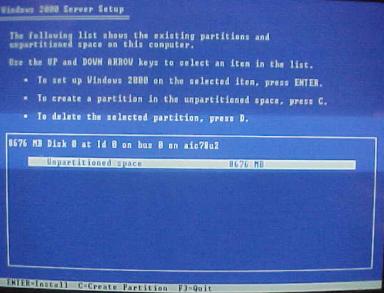
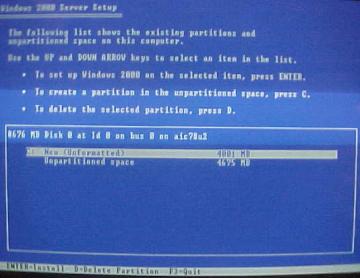
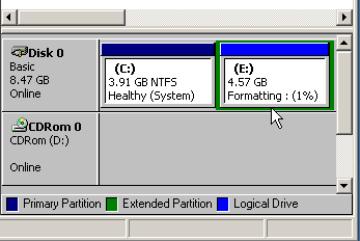
Deleting hard disk partitions.
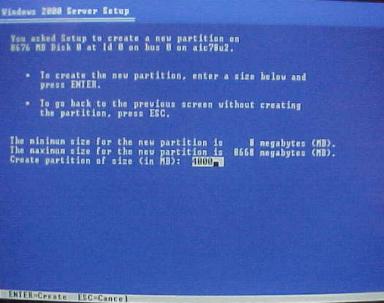
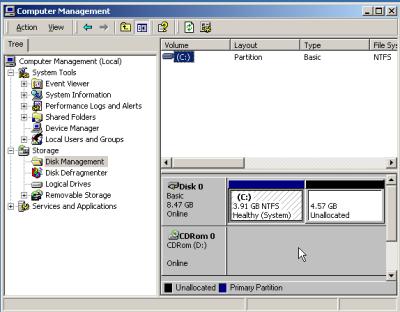
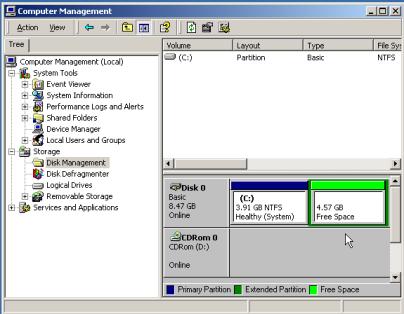
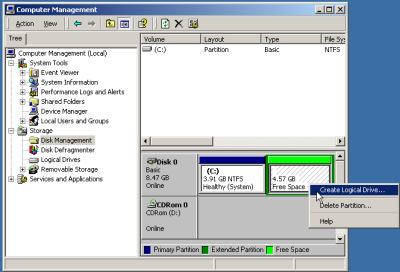
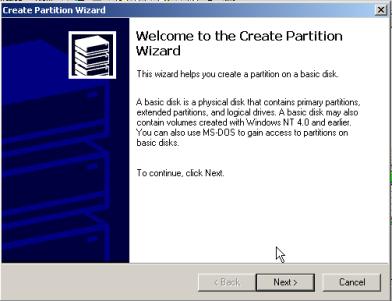
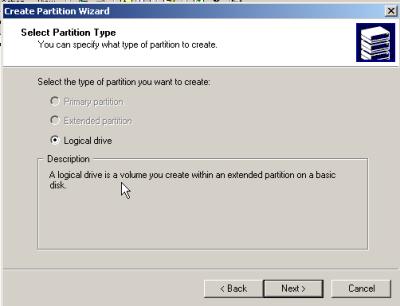
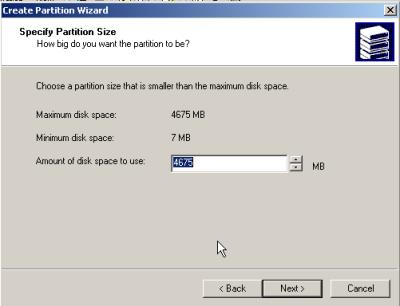
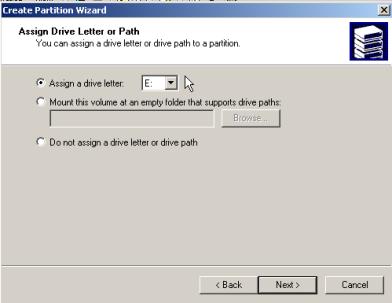
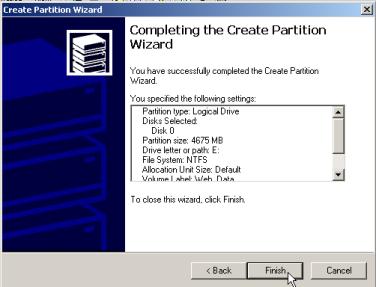
Configuring a Logical Hard Drive
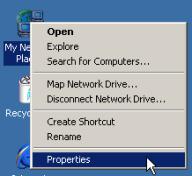
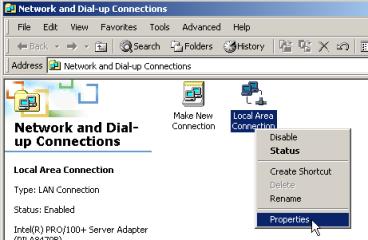
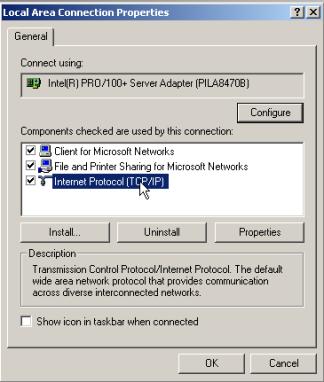
Binding Multiple IP Address to the Network Interface Card
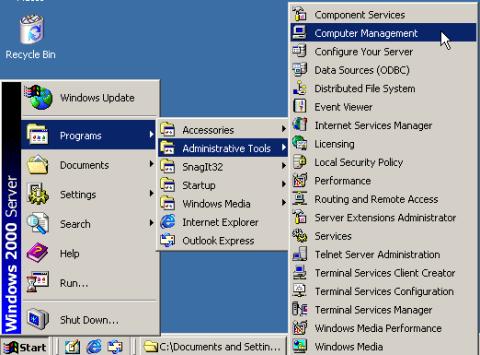
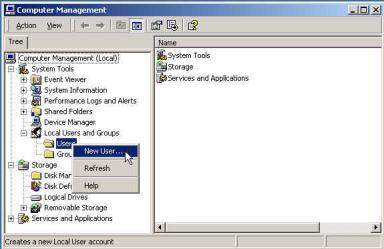
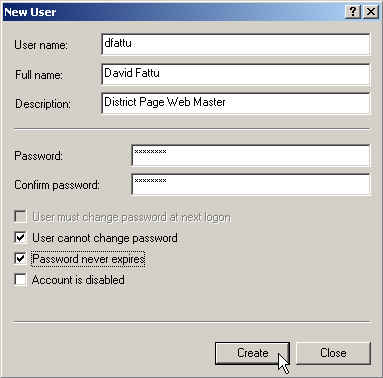
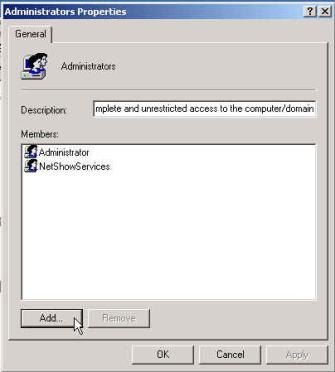
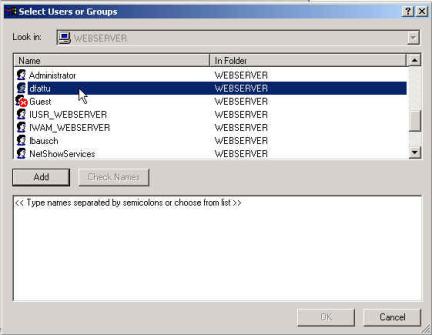
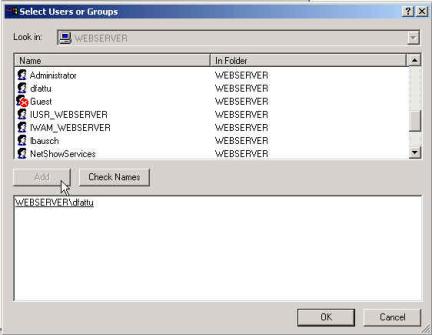
Creating a New Windows User
Account
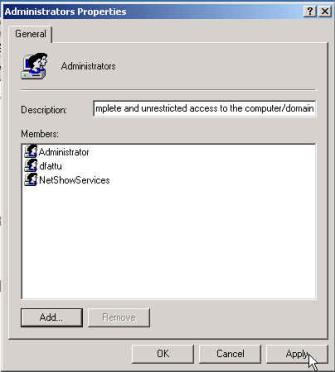
Adding a User to the
Administrators Group
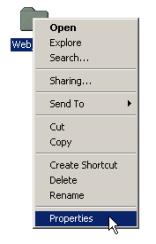
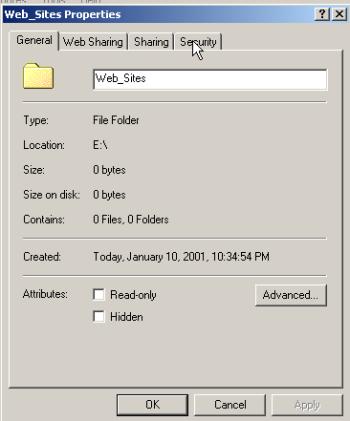
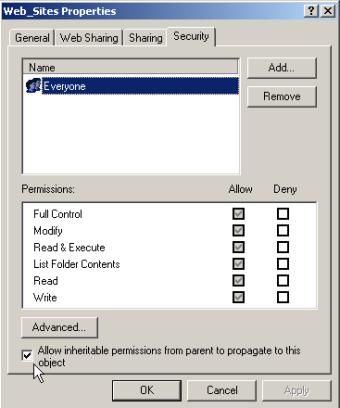
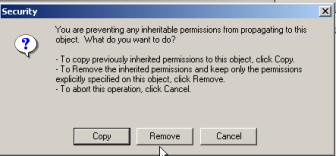
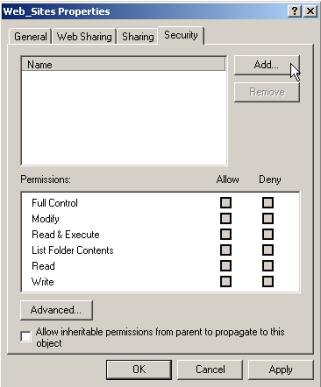
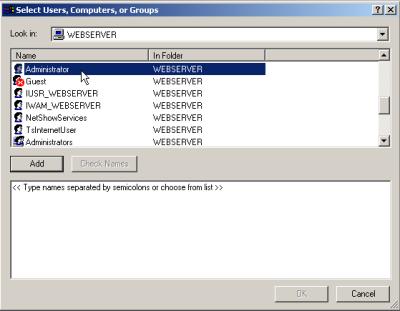
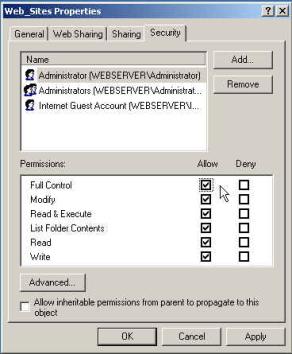
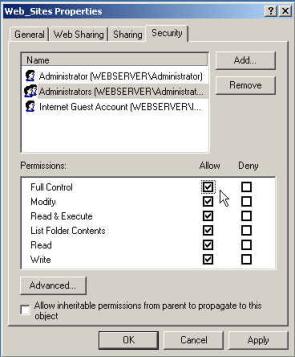
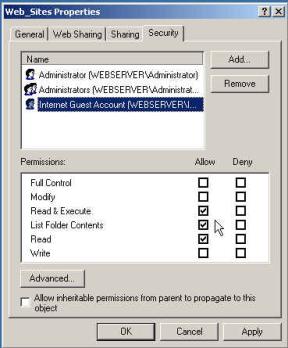
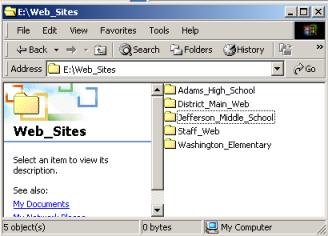
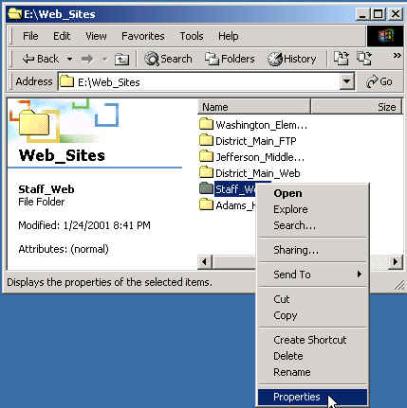
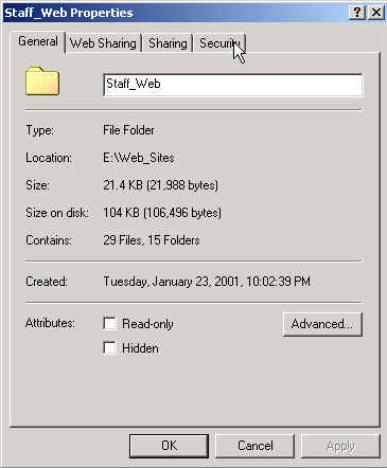
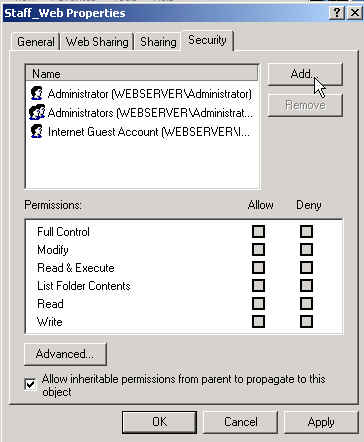
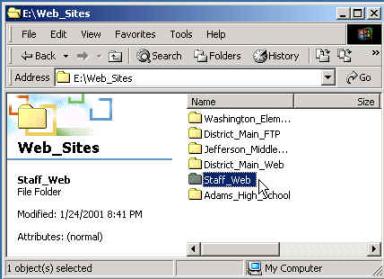
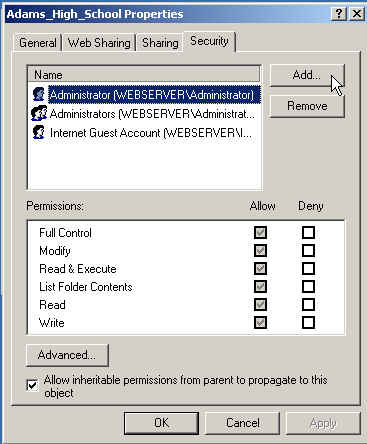
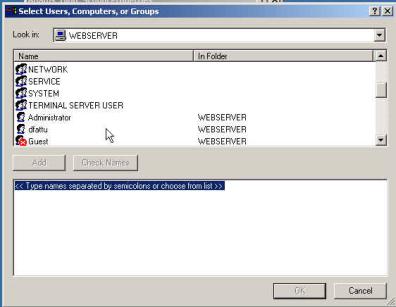
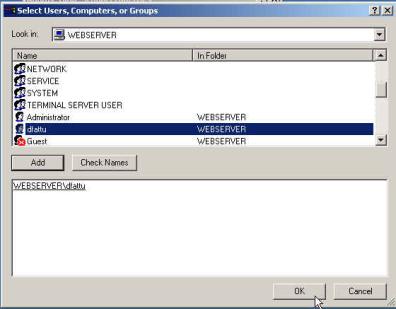
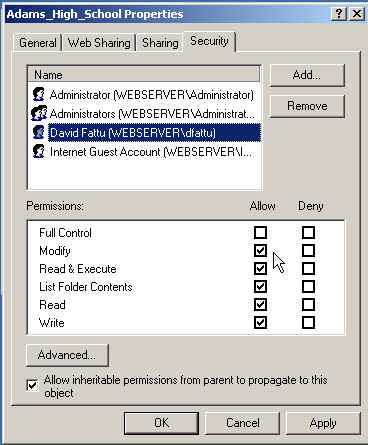
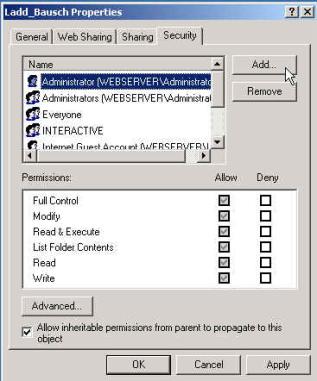
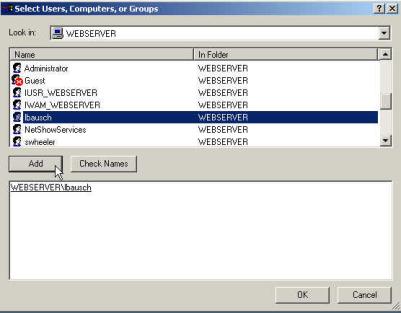
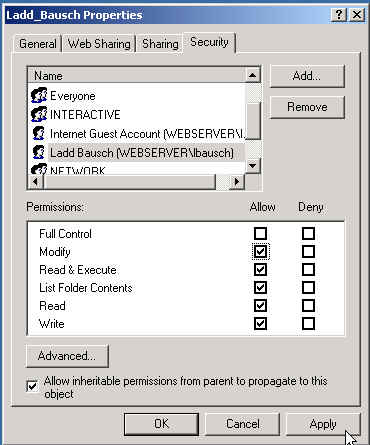
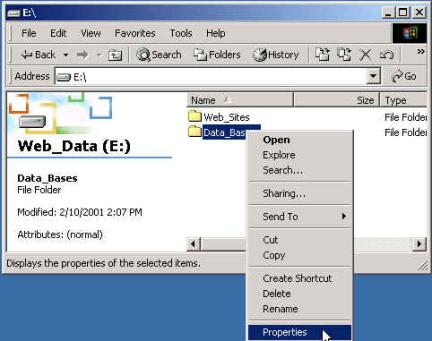
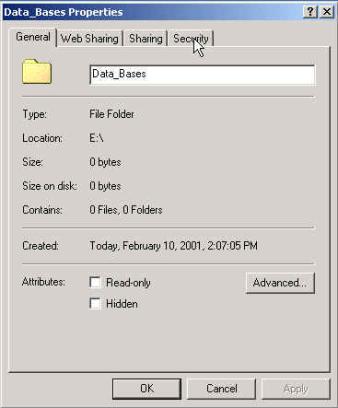
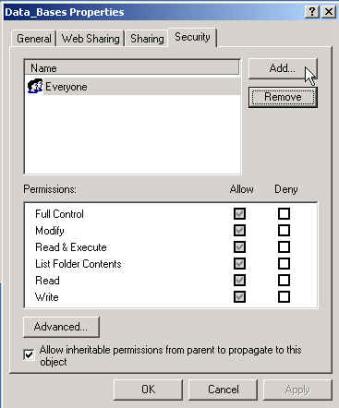
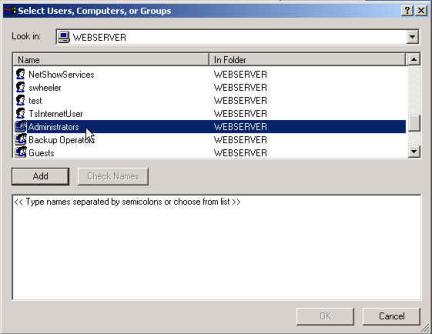
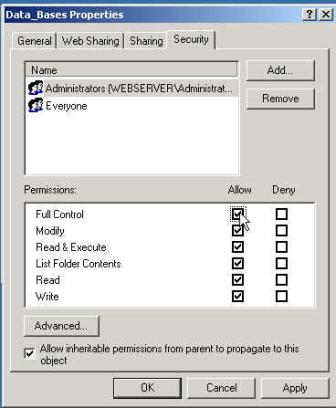
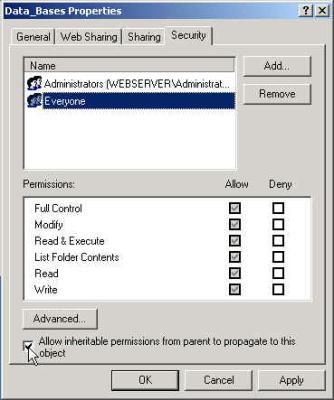
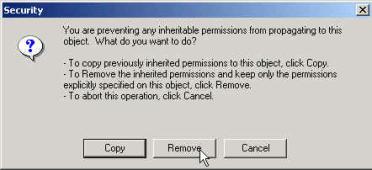
Creating Data Folders and Setting NTFS Security
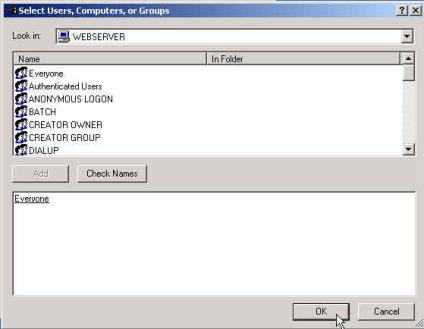
Changing Permissions to the
Staff_Web Folder
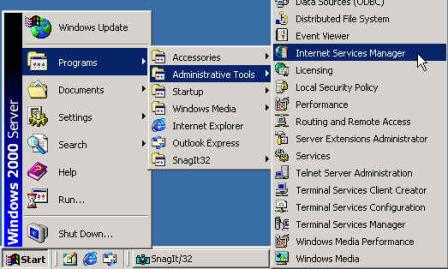
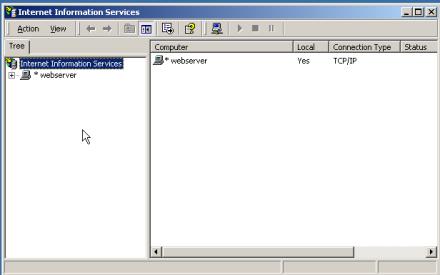
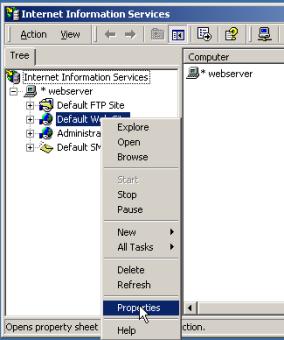
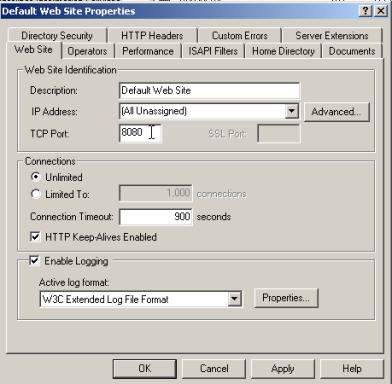
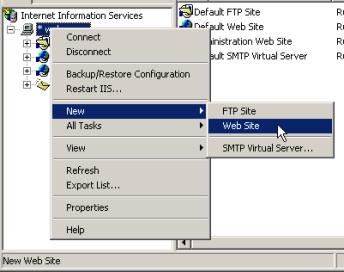
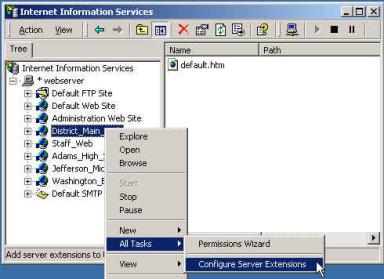
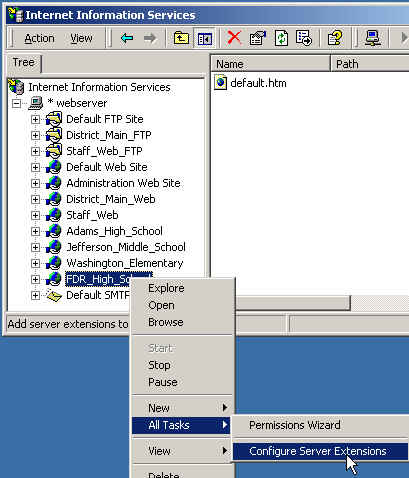
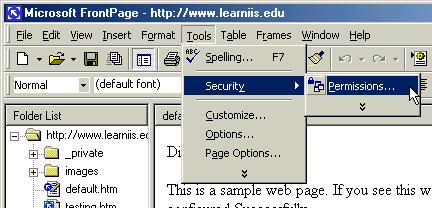
Configuring Internet Information Server 5.0
Changing the TCP Port on the
Default Web Site
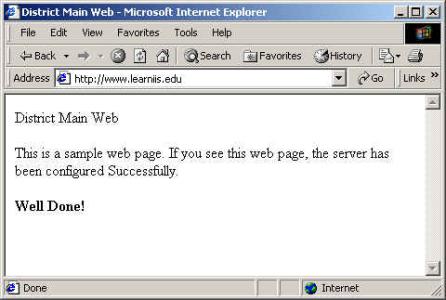
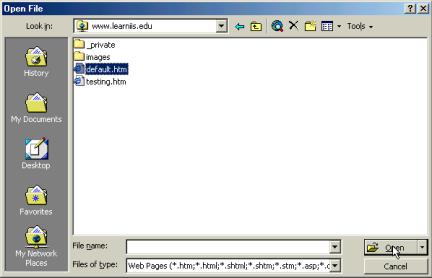
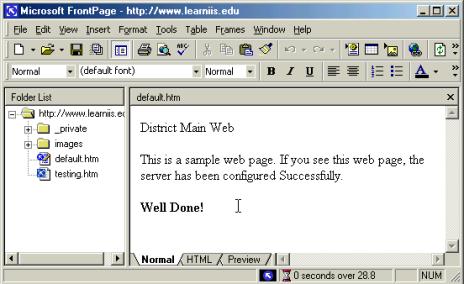
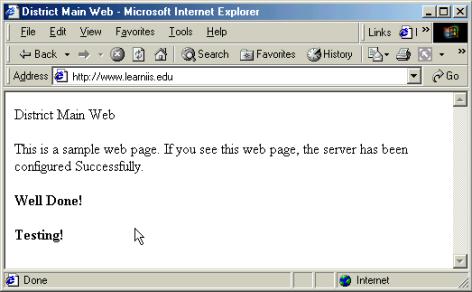
Testing your MS Internet Information
Server
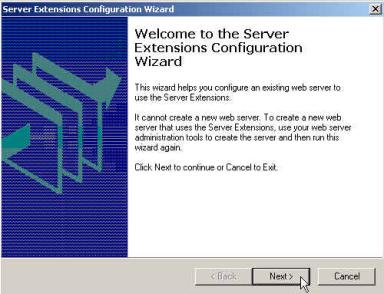
Configuring FrontPage Extensions
Creating a New Web using Host Headers
Testing the Host Header Web
Site
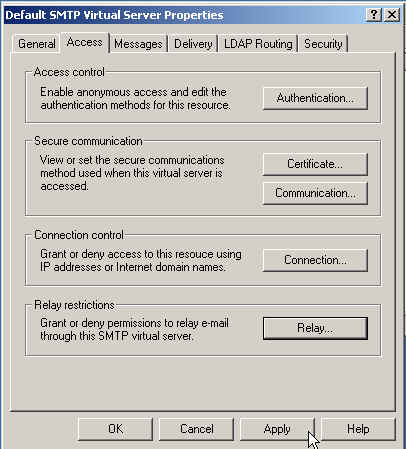
Configuring the SMTP Mail Pass
Through
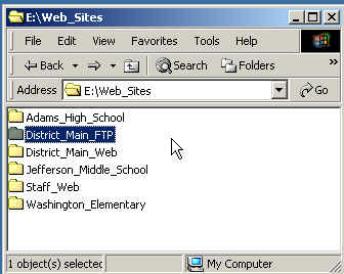
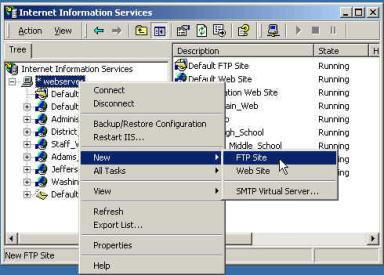
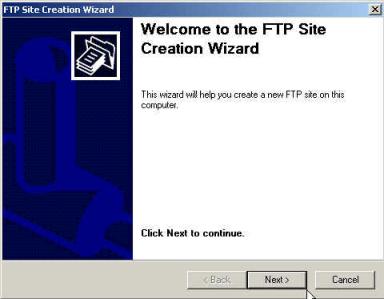
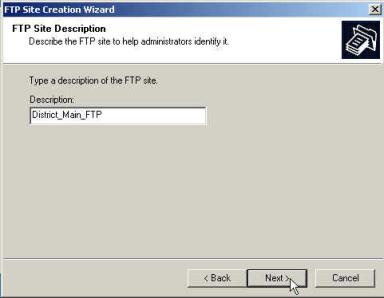
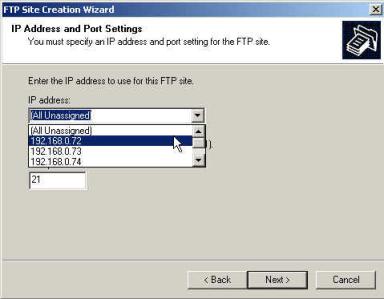
Configuring the District
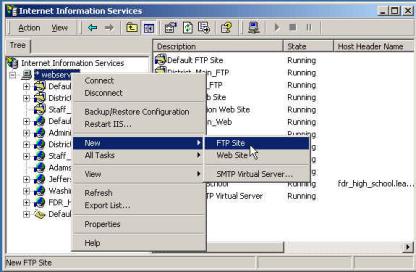
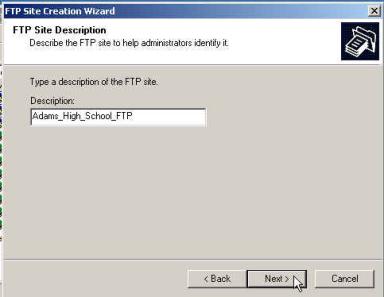
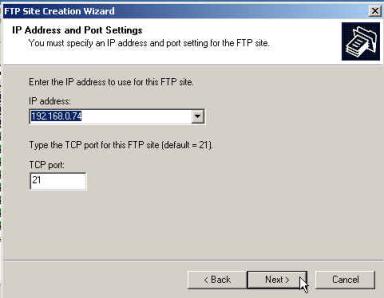
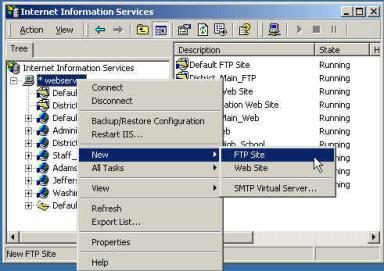
Public FTP Site
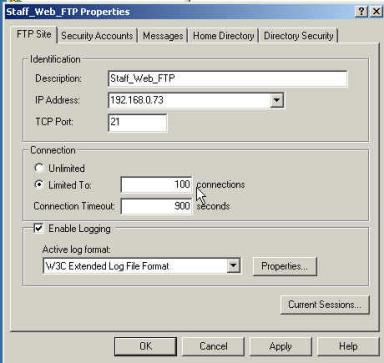
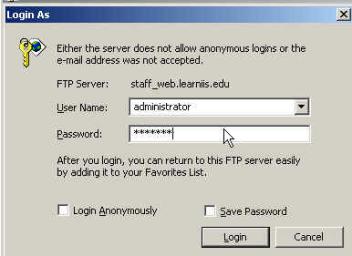
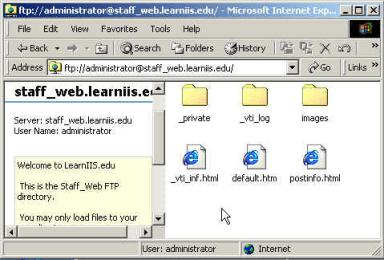
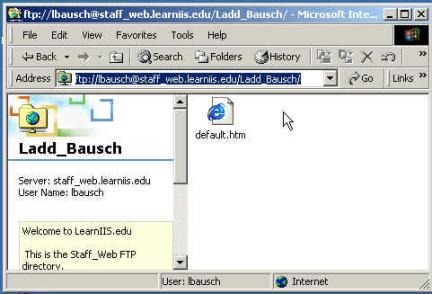
Configuring the Staff Web FTP
Site
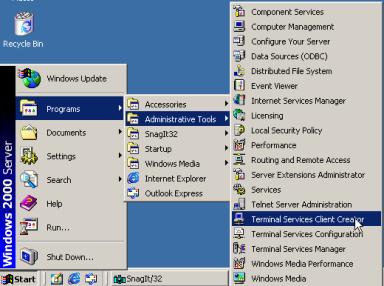
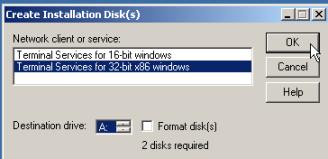
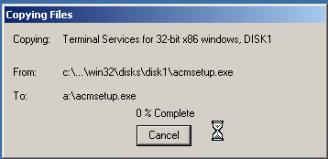
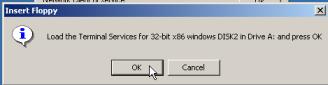
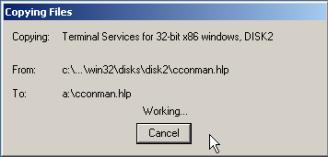
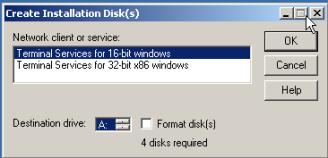
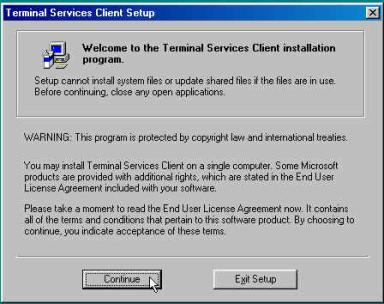
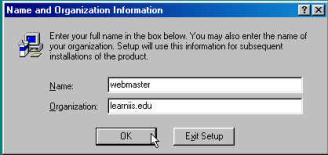
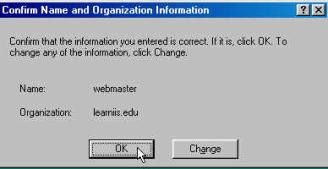
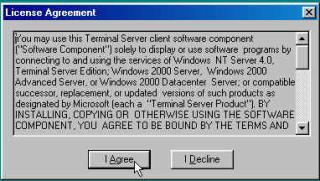
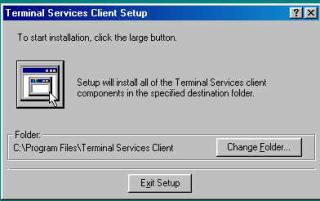
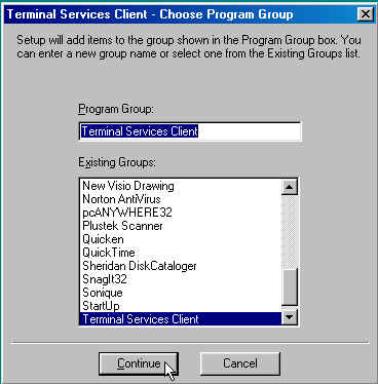
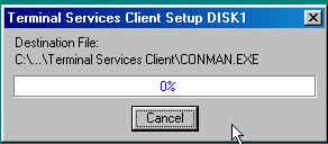
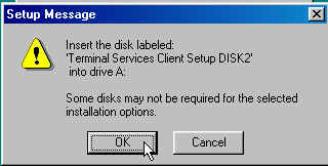
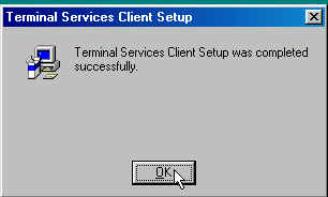
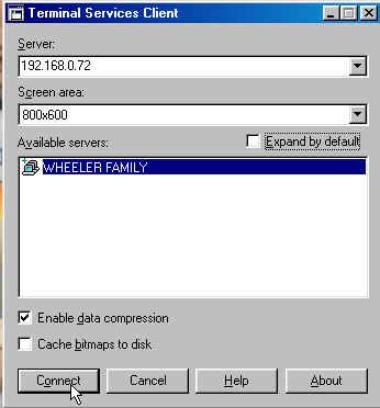
Creating and Installing Terminal Server Client
Creating Terminal Server
Client Disk
Installing Terminal Server
Client
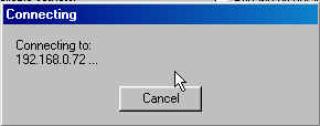
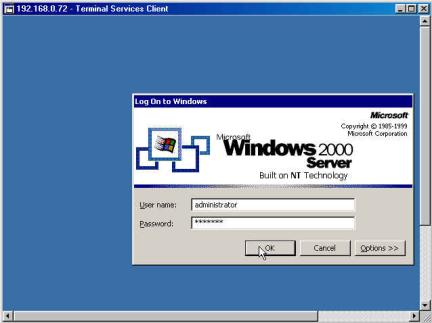
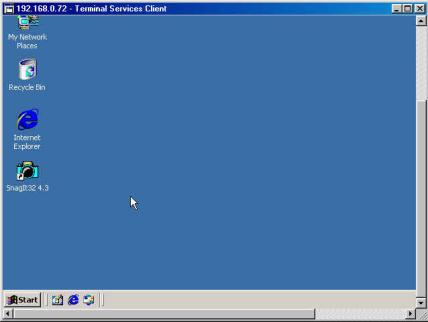
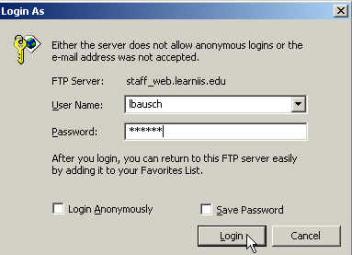
Logging into the Web Server
with Terminal Server
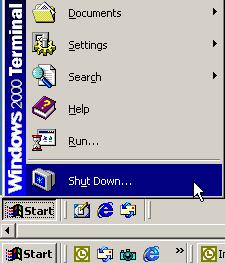
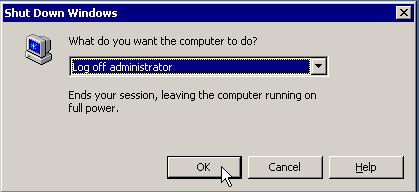
Logging off the Web Server
with Terminal Server
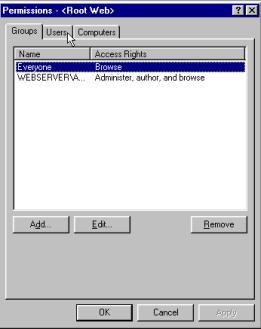
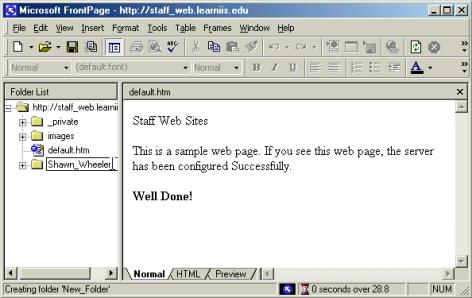
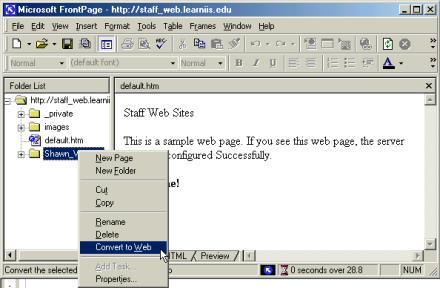
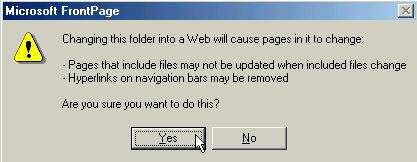
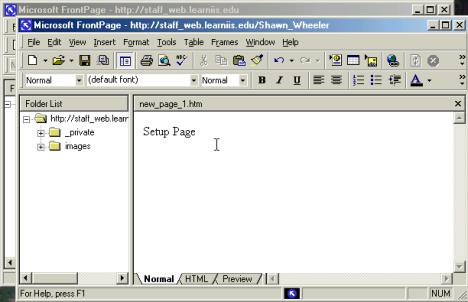
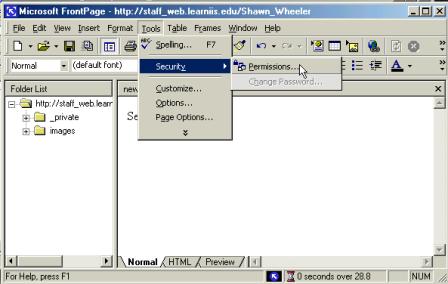
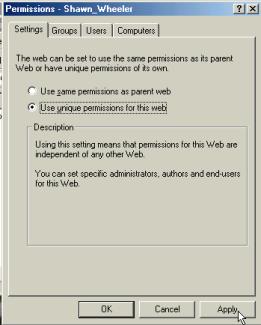
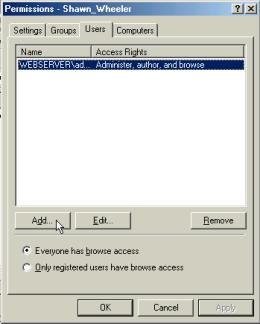
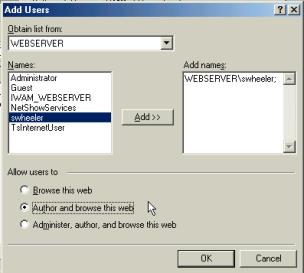
Setting Web Site Permissions and Creating Sub Web Sites
Setting FrontPage Web Site
Permissions
Setting FTP Sub Web Site
Permissions
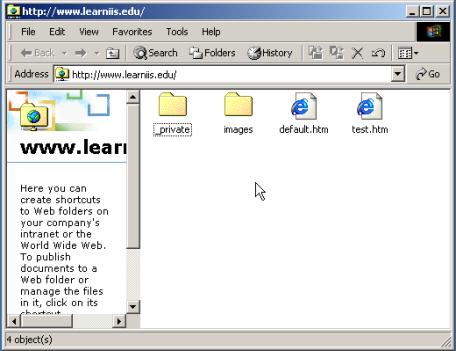
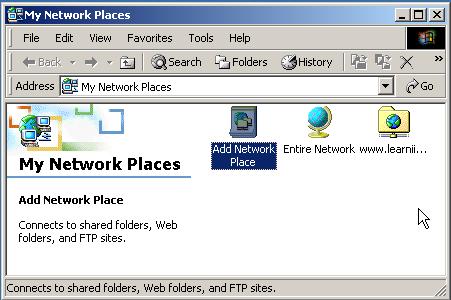
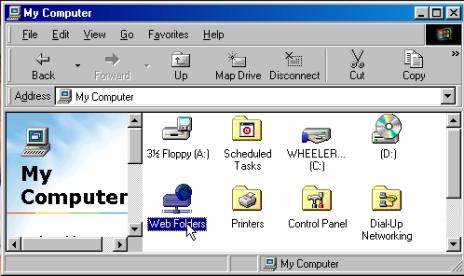
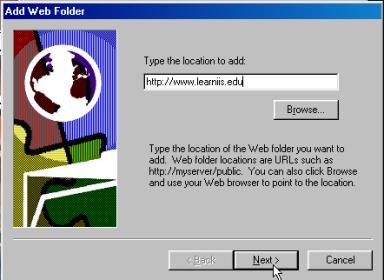
Creating a Web Folder using
Windows 2000 or Windows ME
Creating a Web Folder using
Windows NT 4.0 or Windows 98
Choices for Publishing Web Content
Setting folder Permissions for
Data Access
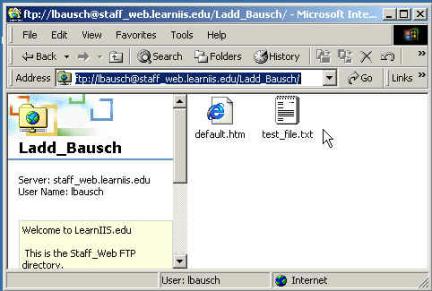
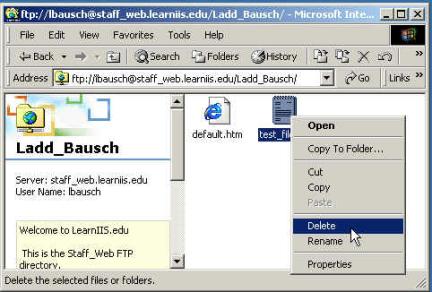
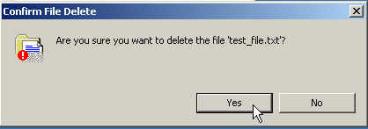
Copying ASP Data into the
Staff Web Folder
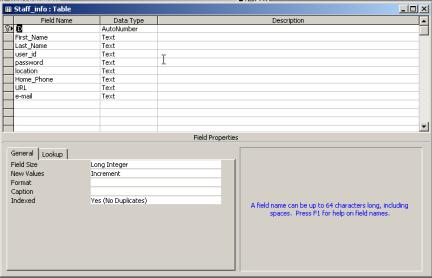
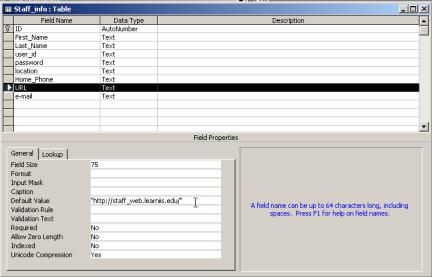
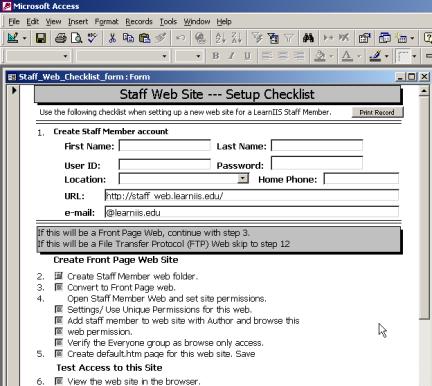
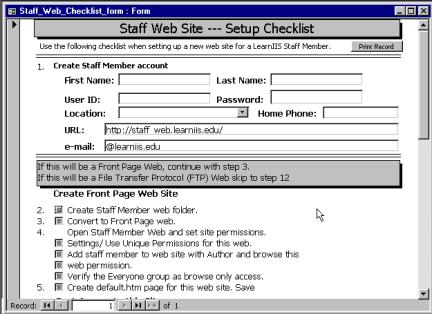
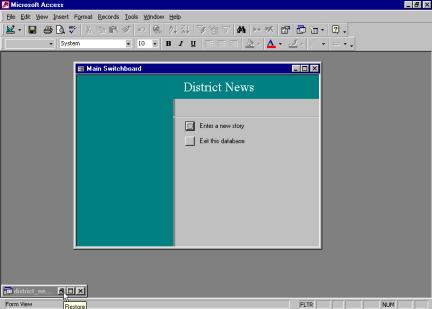
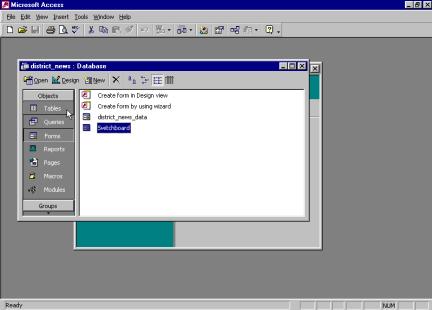
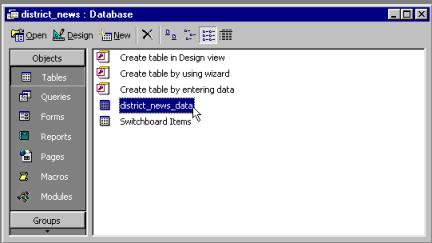
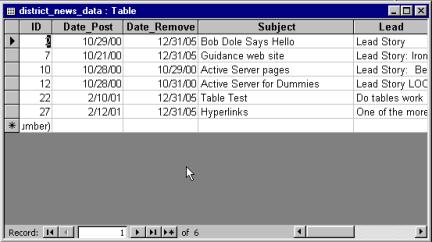
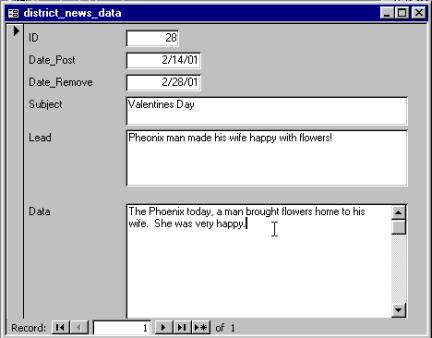
Customizing the Staff_web.mbd
file.
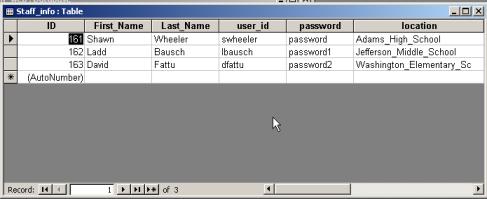
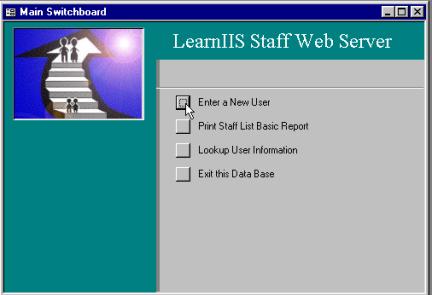
Entering a staff member into
the database
Copying ASP Data into the
District Main Web Folder
Customizing the District_News
.mbd file.
Introduction
Preface |
|
The past five years has seen exponential growth in the use of technology. The sound of a mobile phone ringing causes 9 out of 10 people to reach for a device on their person. The single home computer system is quickly changing to a home network. Parting friends no longer say, “Call Me!” but rather “E-mail me!” The growth of the Internet has been equally impressive. It is difficult these days to find a business without .com behind its name. Universities have .edu and local school district proudly displays its state and country, mydistrict.k12.az.us. School communication has also grown. Parents, and the communities which schools serve, desire more and more information. The Internet provides the medium to disseminate this information. Microsoft provides the perfect tool for placing this information on the Internet in the form of Microsoft Windows 2000 Server combined with Internet Information Server 5.0. While schools and school districts continue to design or expand their computer networks, society continues to demand information. Unfortunately, many school districts use 100% of their resources to keep their networks functioning. Adding to these problems is the public sector’s demand for experienced network administrators and technicians. It is difficult for school districts to compete with the salaries offered by corporate America. This document is designed for the staff member who is charged with the task of setting up and managing a Microsoft Internet Information Server and has not had the opportunity to become an expert in the intricacies of this powerful tool. The World Wide Web and Your School District is a step-by-step guide to: q Installing Windows 2000 Server q Configuring Internet Information Server including SMTP q Configuring FrontPage Security q Setting up Web Folders q Configuring data access web pages using supplied html code and Access databases Documentation will also include: q How to use this guide q Conventions used in this document q Server considerations q Information and supplies to gather before you begin q Web Server Procedure Check List q Troubleshooting The World Wide Web and Your School District will not include: q Backing up your web server q The installation of PERL q The use of CGI q How to design or manage a web site |
Acknowledgements |
||
|
|
I want to take a moment
to thank the people have taken time out of their life to help me with this
project. To my wife and daughter
Jenifer and Victoria who never complained as I spent countless hours with my
face glued to a computer monitor. To Ladd Bausch a great
friend and mentor who not only edited and advised me throughout this
writing. He also spent the past four
years helping me hone my skills as a technical writer. To Logan Bausch who beta
tested and provided feedback. To Peoria Unified School
District, which has employed me for the past 8 years and allowed me the
opportunity to gain the knowledge, I pass on through this book. To my Mom and Dad whose
countless sacrifices enabled me to complete my education. |
|
How to use this guide |
||
|
|
The World Wide Web and
Your School District is designed
to be a two-phase tutorial and guide with the non-technical staff member in
mind. Each chapter is laid out with
step-by-step procedures guiding you through the process of setting up a
Windows 2000 web server for your school district. Upon completion of this guide, you will have a functioning web
server which host separate and secure web sites for each school in your
district. Additionally, your server
will be able host a separate and secure web site for each teacher in your
district. Phase One For the first time Web
Server administrator, Microsoft Internet Information Server (IIS) can be
intimidating. Therefore, I recommend
you follow the procedures laid out in this book one time as a learning
experience. To help with troubleshooting,
I also recommend using the same schools and user names used in this guide. Phase Two After you have
successfully completed your “practice build” of the web server, complete the
process a second time using your district’s school names. To aid you in the process of building your
production web server, I have included a Web Server Procedure Checklist. Please review this checklist and obtain
the required information from your network administrator prior to building
your web server. Each chapter will contain
an overview of the task you will be completing. Please take the time to review this information prior to
beginning the chapter. And finally, I have
included two sample databases along with the Active Server Page (ASP)
scripts. These are the same databases
I developed and use at my school district.
The World Wide Web and
Your School District is not the
definitive guide to IIS. It will,
however, get your web server up and running.
As time and resources allow, I highly recommend attending a Microsoft
Certified Class on Internet Information Server. Training information may be
found at the following URL: www.microsoft.com/windows2000/training
Take a deep breath…
Now go to it! |
|
Conventions used in this document |
|
|
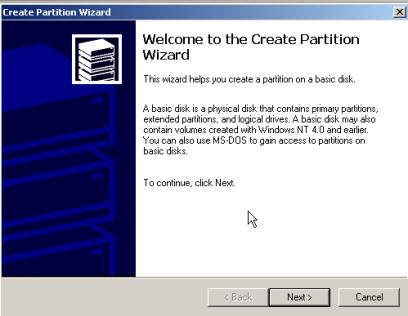
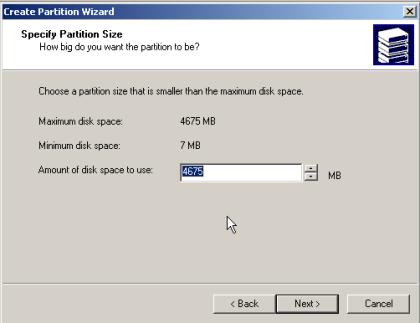
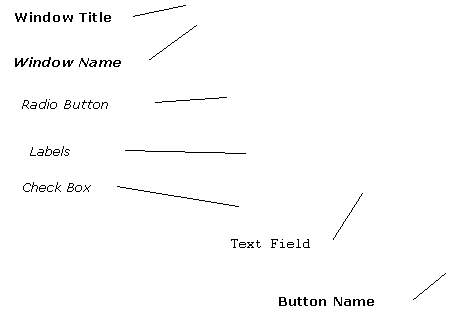
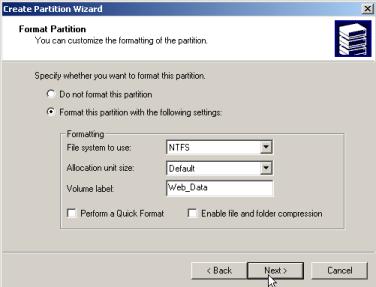
The World Wide Web and Your School District contains a number of screen captures to assist you with the installation and configuration of Windows 2000 Server and Internet Information Server 5.0. Information pertaining to the screen capture will be posted directly above the image. To minimize confusion, different fonts or font styles will be used to distinguish different areas of the window. The title of this window Create Partition Wizard will be displayed in Bold. The name of this window Format Partition will be displayed with Bold Italic. Any radio button, check box or text field will be displayed in Italic. Any text you are to type in a text field will be displayed in Courier 10. Any button requiring an
action will be displayed in Bold. Example: Click Add… Additional information
may be displayed in the left margin. Below is an example from the document. |
|
|
NTFS
partitions are not readable by windows 95, 98 or Me machines if the machine
is booted with a Dos disk. |
|
|
|
|
Server Considerations |
||||||||
|
|
The specific needs of
your school district will determine the type of server needed. For example: The number of virtual web sites, the number of daily hits to
your web server, the number of concurrent hits to your web server. Below you will see Microsoft’s minimum
recommendations for server running Windows 2000.
The above will work
wonderfully for a test server.
However, on your production server I would recommend the following as
a minimum standard. Pentium II
500 with 256 megabytes of RAM and 12 gigabytes of hard drive space. If your budget allows for
a faster machine, consider upgrading to dual processors and upgrade your RAM
to 512 megabytes. Additionally, you will want to include a RAID hard drive
Array of and redundant power supplies.
Last but not least,
install a backup tape drive. I will not recommend a
specific brand of server. However, I
will recommend purchasing from a major computer manufacturer. Your web server
is not the place to save a few dollars. |
|
||||||
Considerations, Information and Supplies |
||||||||||||||||||||||||||
|
|
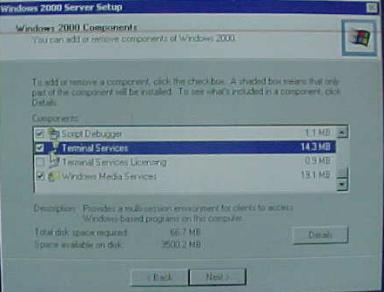
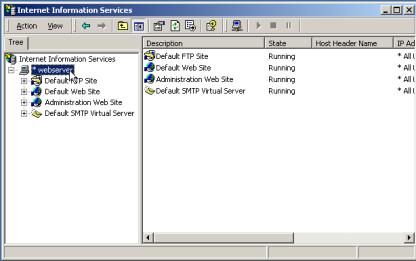
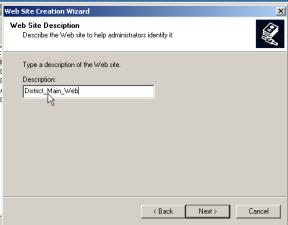
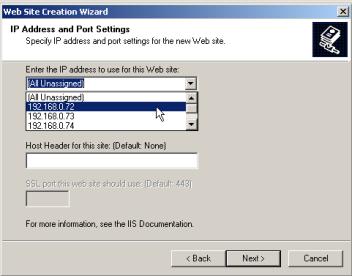
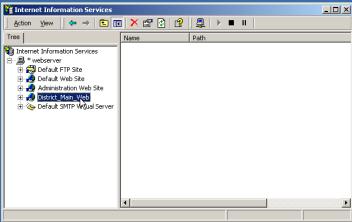
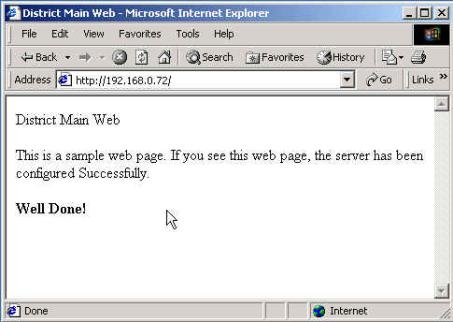
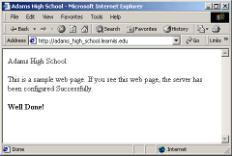
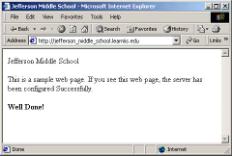
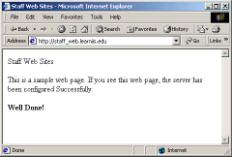
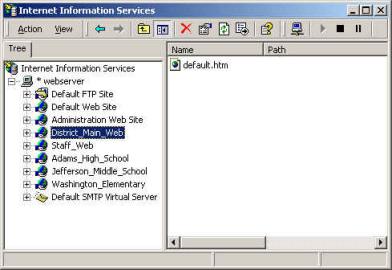
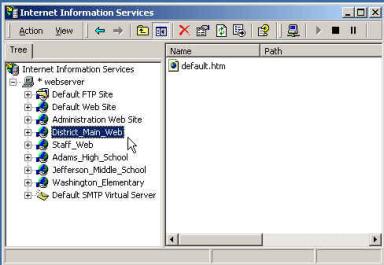
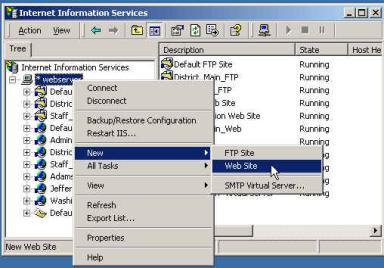
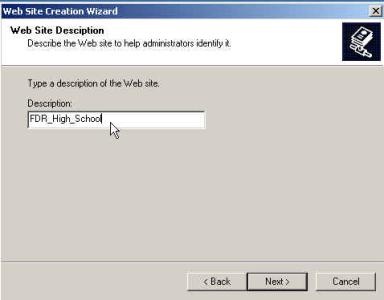
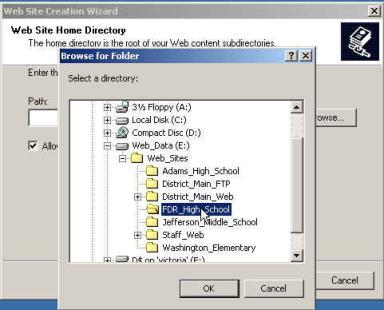
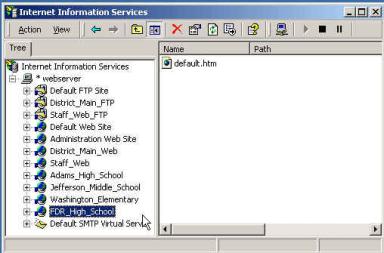
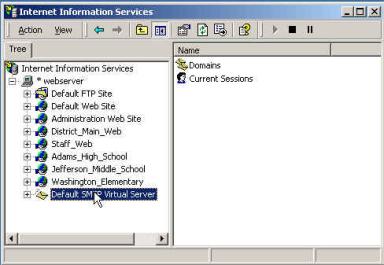
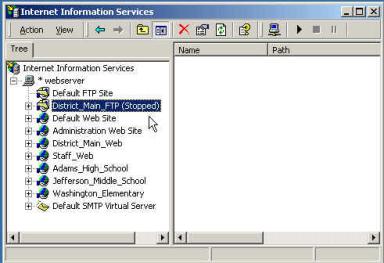
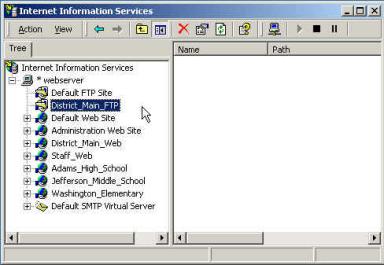
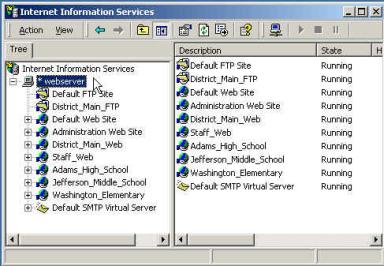
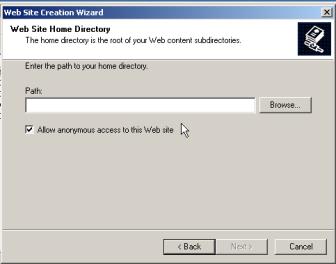
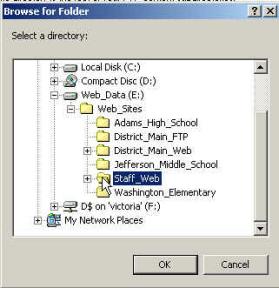
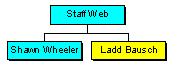
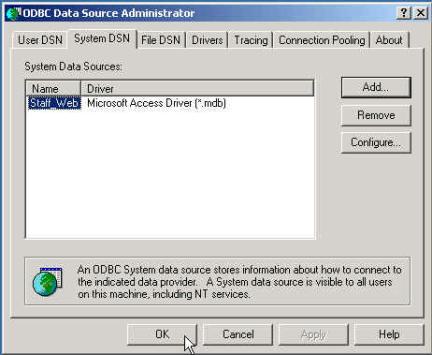
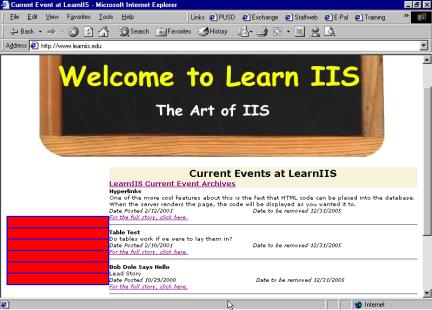
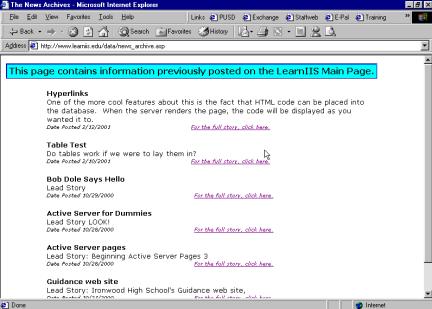
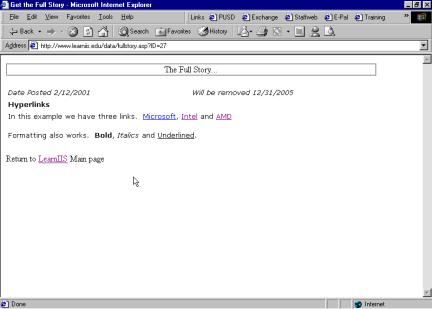
One of the most important features in IIS is the ability to host multiple web sites on one machine. Prior to IIS 4.0, each web site required a separate web server. Using IIS, one web server is capable of hosting multiple web sites. Imagine the expense your school district would incure trying to give each school a separate web site before IIS. See the images below.
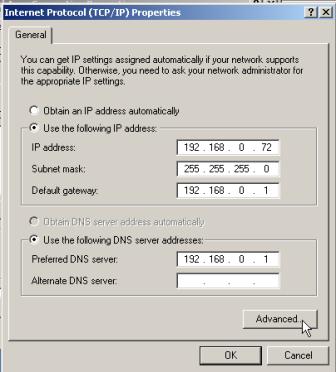
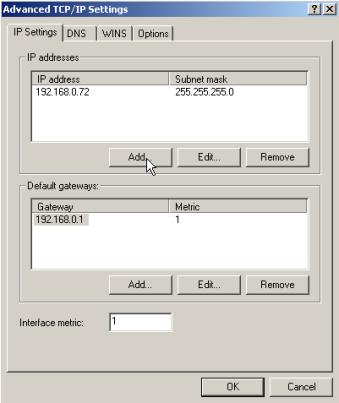
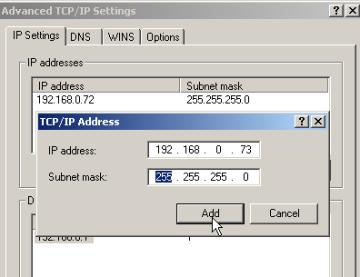
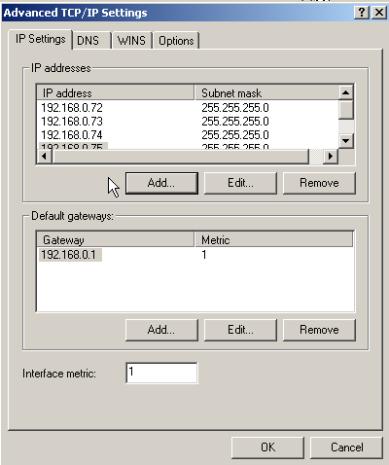
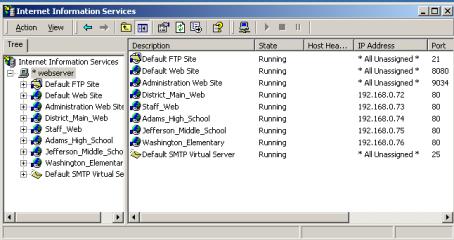
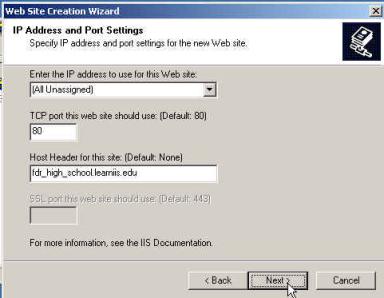
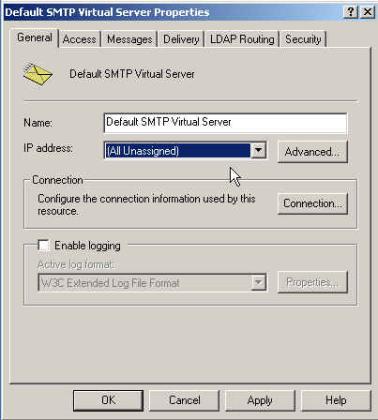
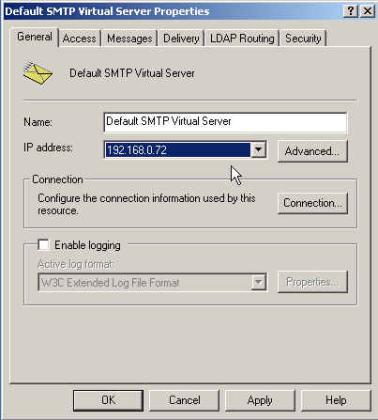
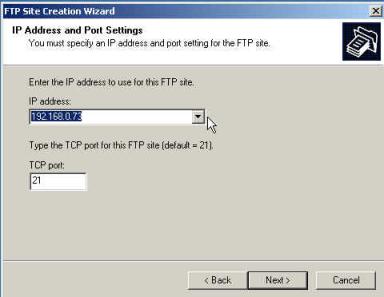
Using IIS, multiple web sites may be placed on one server using multiple IP addresses. These IP addresses are assigned to the servers Network Interface Card (NIC) through a process called Binding. Using the same scenario as above, three machines have been eliminated.
In some scenarios, multiple IP addresses are not available. In this case, IIS can host multiple web sites by using a single IP addresses while taking advantage of Host Headers. Again, three servers have been eliminated.
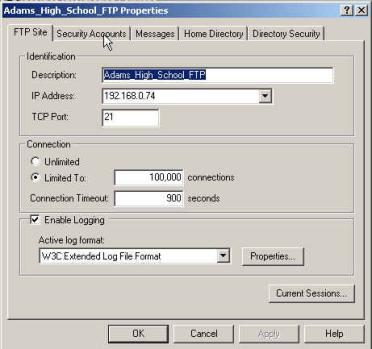
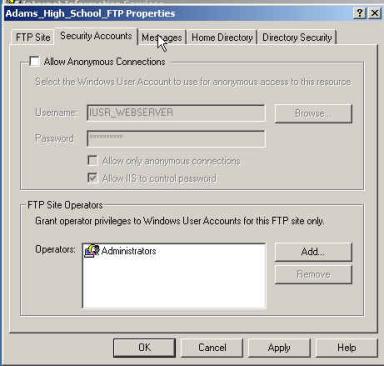
Using Host Headers will require your webmasters use a Microsoft Web-Publishing product to create and maintain their web sites. Personally, I prefer separate IP address for each web site on the web server. Doing this also allows each site you have it’s own FTP site or FTP access for updating the web content. Microsoft recommends not having more than five IP address bound to any NIC and corresponding web site. I believe this recommendation was designed with web sites that take over 100,000 hits per day in mind. It is not likely a school district site will take 100,000 hits per day. At my school district, we have been successfully running 42 web sites with corresponding IP addresses assigned to one NIC for over three years. |
|
||||||||||||||||||||||||
|
|
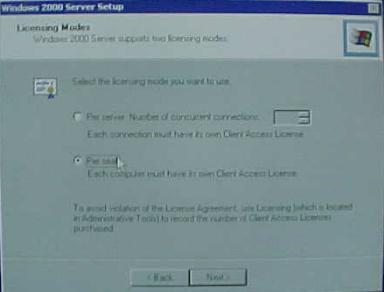
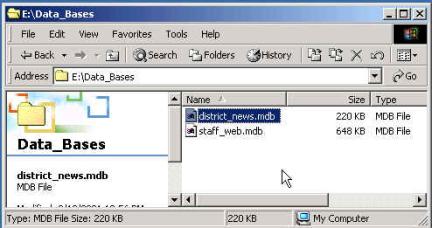
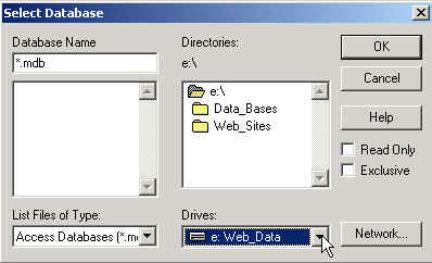
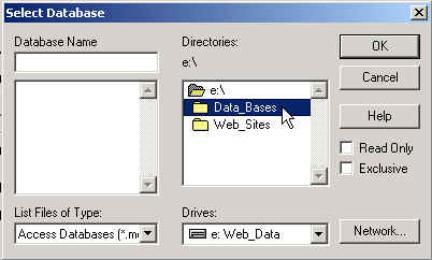
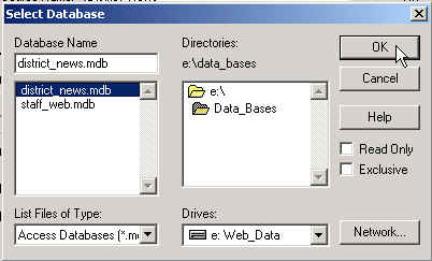
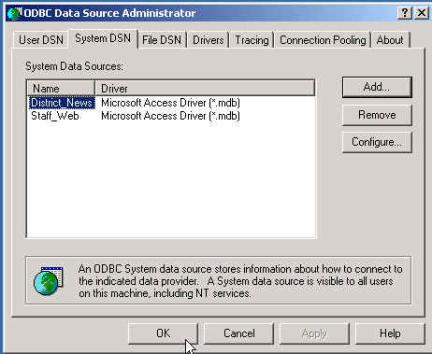
You will find it beneficial to gather the following information and items before your installation of Windows 2000. Network Informationq __________________ Domain name for your district q __________________ IP Addresses to be used on the web server q
__________________
Subnet mask q __________________ Gateway q __________________ DNS settings for your network Server q Server Configuration Utilities (If necessary) q Server specific drivers Software q Windows 2000 Server CD q Backup software (This document will not cover the installation of third party software.) q Anti Virus software (This document will not cover the installation of third party software.) |
|
Web Server Procedure Check List |
|
|
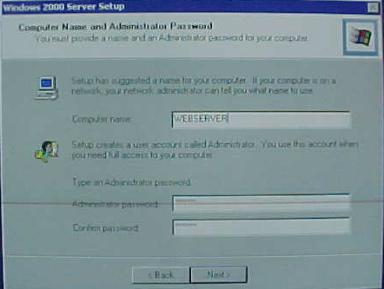
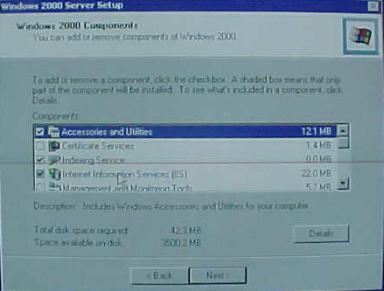
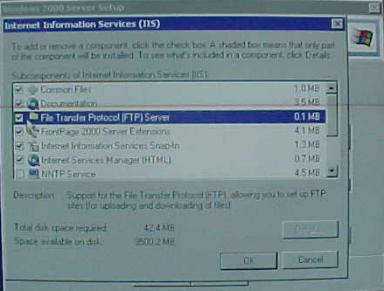
|
Use
this document as a checklist to be sure you have accomplished each task in
each chapter. Additionally you will
want to keep this document in your records. Before you begin: Software q Server specific utilities & drivers q Windows 2000 Server CD q Anti Virus Software q Backup Software (Windows does contain built in software) Network Information q __________________________ District Domain Name q __________________________ Starting IP address (If you will be using a consecutive range of IP addresses, place the last IP in the blank below. If your will be using non consecutive address, please write them on the back of this sheet.) q __________________________ End IP address q __________________________ Subnet mask q __________________________ Gateway q __________________________ Preferred DNS Server q __________________________ Alternative DNS Server Chapter One q __________________________ Partition size q __________________________ The name you will type for owner of the server. q __________________________ Your Organization name q __________________________ Licensing Mode q __________________________ Computer Name q __________________________ Administrator password q Two floppy diskettes Chapter Two q Create Extended partition q _________________________ Extended partition size q Format Extended (Logical) partition q _________________________ Drive letter the assigned to this partition q _________________________ Volume Label Chapter Three q Starting IP address q Subnet mask q Gateway q Preferred DNS Server q Alternative DNS Server q Additional IP addresses added Chapter Four q Create your personal account q Create account for web site masters (If you have them at this a this time) q Add your personal account to the administrators group Chapter Five q Create web site parent folder on the web data drive q Set Folder permissions q Create individual web site folders q Add sample default page to each web site folder q Set Staff_web folder permissions Chapter Six q Change default web site port setting q Create a new Web Site q Assign IP address to the new web site q Create additional web sites and set IP addresses q Test all web sites q Configure web server extensions for all web sites q Configure SMTP Mail q Assign SMTP Mail to the first IP address assigned to the NIC q Set SMTP Mail security q Configure the district public FTP Site q Assign the first IP assigned to the NIC to this FTP site q Set FTP site permissions q Set FTP site welcome message q Configure School FTP access (if necessary) q Set School folder user permissions q Create FTP Site q Assign IP address to school FTP site that corresponds to the school web site IP q Set School FTP permissions q Set School FTP site welcome message q Configure Staff Web FTP access q Create Staff Web FTP Site q Assign IP address to Staff Web FTP site that corresponds to the Staff Web site IP q Set Staff Web FTP site permissions q Set Staff Web FTP welcome message Chapter Seven q Create Terminal Server Client Disk 1 q Create Terminal Server Client Disk 2 q Install Terminal Server Client on your workstation Chapter Eight q Create user accounts q Set user permissions through FrontPage on the web site q Test permissions q Create the sub web (FrontPage) q Set the sub web security q Create default page for the sub web q Test the sub web q Create the sub web folder (FTP) q Set the sub web folder permissions q Create default page for the sub web q Test the sub web Chapter Nine q Create Web folder on your workstation Chapter Ten q Create Data_bases folder q Set permissions for the Data_bases folder q Copy staff_web.mdb to Data_bases folder q Create the staff_web DSN q Copy the ASP pages to staff web folder q Delete the default.htm file q Test the ASP pages in the browser q Customize the staff_web.mbd q Add your schools or locations q Customize staff_info table q Delete users from the staff_info table q Customize staff_web_checklist_form q Enter new users to the staff_info table q Copy district_news.mdb to Data_bases folder q Create the district_news DSN q Copy the ASP pages to the district web folder q Delete default.htm file from the district web folder q Test the ASP pages in the browser q Customize the district_new.mbd q Delete existing news stories q Enter a new news story |