Chapter Four 1
Chapter 4 Overview. 1
Creating Users Accounts 2
Creating a New Windows User
Account 2
Adding a User to the
Administrators Group. 5
In Chapter 4 you will create user accounts on your web
server. These accounts are necessary
for your future webmasters to post their web pages to your web server. Additionally you will add a user to the
administrators group.
Materials needed in this chapter
q
No additional materials are needed
|
|
|
|
|
|
|
Any person who wishes to publish information to the web
server must have a Windows user account on the web server.
Windows user accounts must be set up on the Windows 2000
Server. If you do not have direct
physical access to your web server, log into the web sever using Terminal
Server. See chapter 6 for details.
Note: You must log into the server as the
administrator.
|
Creating a New Windows User
Account
|
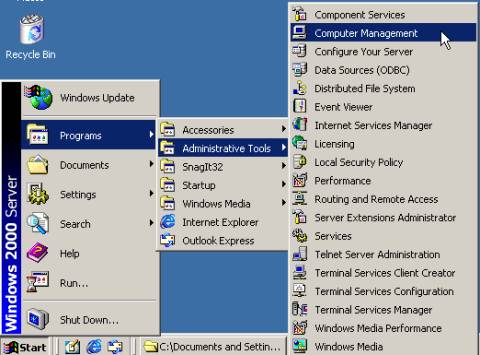
- Click
Start, choose Programs, Administrative Tools, and
click on Computer Management.
|
|
|

|
|
|
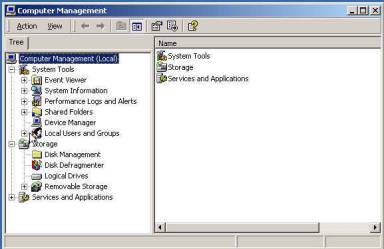
- Computer
Management window:
Locate the Local Users and Groups icon. Expand this group by clicking the plus
sign.
|
|
|
|
|
|
- Computer
Management window:
Place the pointer over the Users folder. Click the right mouse button, choose New
User…
|
|
|

|
|
|
It is important to
devise a user naming convention for your web server. Generally first initial + last name is
used. However, you may choose a
different convention if you so desire.
Additionally, you will
want to place a text in the description field that will help identify this
user. The school the person works
at may be very helpful in this field.
|
|
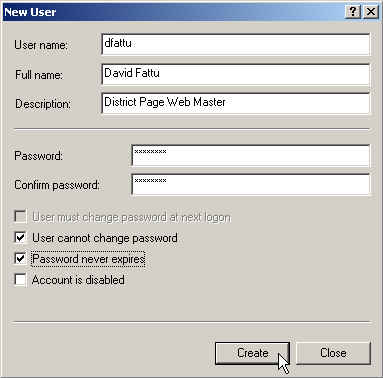
- New
User window:
Type dfattu in the User name field. Type David Fattu
in the Full name field. Type a
District Page Web Master
in the Description field. In the password field type a password,
then confirm the password by re-typing the password
in the confirm password field.
Remove the check mark from the User
must change password at next logon check box. Place a check mark in the check boxes
next to User cannot change
password and Password never
expires. Click Create,
Click Close.
|
|
|
|
|
- Computer
Management window:
Close this window.
|
|
|
Day to day operation to
your web server often require administrative rights to the server. In most cases, it is more convenient for
your personal account to have the same rights to the machine as your
Administrator account has. In this
section, you will add David Fattu to the Administrators group.
|
|
|
- Click
Start, choose Programs, Administrative Tools, and click on
Computer Management.
|
|
|
|
|
|
- Computer
Management window:
Locate the Local Users and Groups icon. Expand this group by clicking the plus
sign.
|
|
|

|
|
|
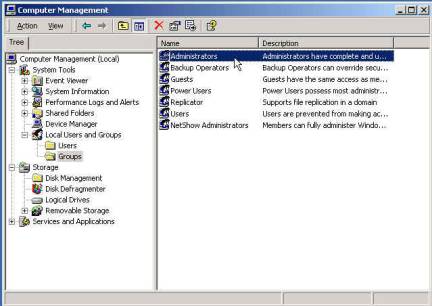
- Computer
Management window:
Click the Groups folder.
The computer groups will be displayed in the opposite window
frame.
|
|
|

|
|
|
- Computer
Management window:
Place the pointer over the Administrators group. Double click the left mouse button.
|
|
|
|
|
|
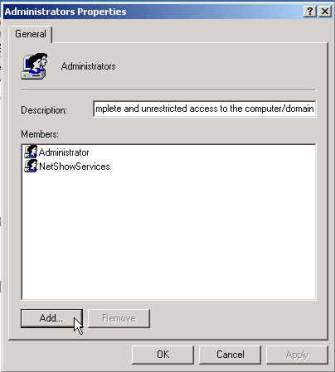
- Administrators
Properties window: click the Add button.
|
|
|
|
|
|
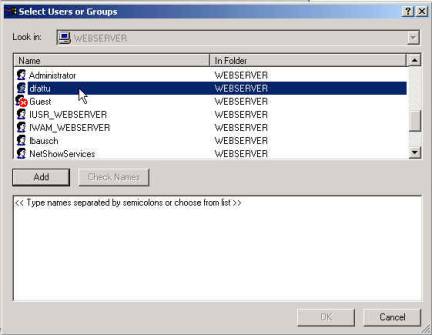
- Select
User or Groups window:
Locate dfattu, select this name by clicking once with the left
mouse button.
|
|
|
|
|
|
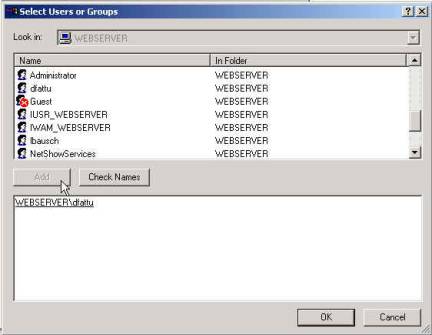
- Select
User or Groups window:
Click the Add button. Click Ok.
|
|
|
|
|
|
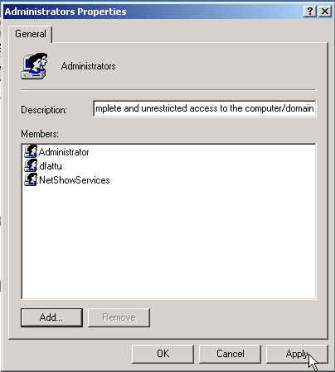
- Administrators
Properties window: click the Apply button,
click Close.
|
|
|
|
|
|
- Computer
Management window:
Close this window.
|
|
|

|